Posted on

CRAWLER HARNESS DESIGN Part Two

by Norm Ziesman

(This blog was updated on January 25, 2024.)

In part one of this two-part blog I covered my thoughts and learnings on line, knots and hooks. For those that read through the whole blog, hopefully you found the information, or at least some of it, useful in your building or selection of crawler harnesses. In this considerably longer blog, I will cover the rest of the crawler harness components and share with you my thoughts, experiences and recommendations as well as some rules and exceptions to rules I have developed over the thousands of rigs I have created.

We’ll get through the less controversial remaining components first before we tackle the big two – beads and blades. 

SWIVEL

Many rig builders tie off their harness with a loop.  I think that is just fine and a matter of personal preference.  The other option, of course, is to tie off the harness with a swivel.  I have always chosen to do that, primarily because I don’t know if the person getting my rig has a suitable swivel in their tackle box.  Many do but some do not.  So, I really do it as a matter of convenience.

It does lead to a debate on what to attach it to on your main line.  A swivel attached to a snap swivel is certainly not needed so, it would logically just have to be attached to a plain snap.

One thing I do like about the swivel is that I tie it with a Palomar knot which puts the line through the swivel eye twice, giving you two points to spread the stress over and avoiding a single “stress point” or possible point of failure taking all the stress.

As far as types of swivels, most agree that ball bearing swivels are the tops and preferred swivels followed by crane and then barrel swivels.  They are also priced accordingly.  So, if you are making just a few for yourself, go for the best.  If you are going to be producing hundreds or thousands, then budget is a consideration.  They all work fine – it is just a matter of affordability and where you want to spend your money.  In bulk, ball bearing swivels are around 10 times more expensive than barrel and crane swivels.

Size wise – I go with 30 – 35 lb test swivels for most rigs with size 4 blades and smaller.  For rigs with larger blades, I will step up one size in swivel (usually around 75 lb test).

As far as color is concerned, I prefer black swivels over brass or nickel.  However, black is usually priced slightly higher than brass or nickel as well. To be truthful, I go back and forth between black and brass, but I still prefer black. It is your call.

If you are tying a loop, then make sure you choose a knot where the knot holds in place and does not slide up.

CLEVIS

There are four types of clevises – quick change, stirrup, folded and clip–n-spin.  In quick change clevises, there are three types – regular (original with no blade keeper barb), improved ones with a “ blade keeper barb” and those made by Dutch Fork.

First up, do NOT buy or use stirrup clevises.  They are for wire-based spinners, not fishing-line-based spinners.

Budget wise, folded clevises are the way to go.

If you like the quick change concept, then go with the Dutch Fork design for optimum performance. If you don’t like those and prefer the standard quick change clevises, get ones with a blade keeper barb on them. The Clip ‘N’ Spin clevis also works well for the quick blade change concept and, like the Dutch Fork, does a better job of keeping the blade from flying off.

If you go with folded clevises, you need to know two important things – how to shop for size and color choice.

Color choices are nickel, brass or black.  I always buy brass folded clevises. I have no justification for this other than I like to have a hint of gold in every harness.

Secondly, different vendors quote their sizes differently.  So watch out. What Hagens calls size 0, 1, 2 and 3 are respectively called size 1, 2, 4 and 6 at other vendors such as Walleye Supply.  It took me a long time to figure that out. Make sure you know what you are ordering.

In the summer of 2023, I switched over to Clip ‘N’ Spin clevises totally (size 2) – the one size works for all the blades I use. This was primarily due to customer demand by tournament fishermen.

FLOATS

When I first started making spinner rigs, I think I had one float on every harness mixed in with the beads.  I realized most experienced crawler harness fishermen were making, buying and using harnesses without them.  Particularly those fishing big water such as Lake Erie.

Consider using floats when your target fishing area has lots of snags. Put one or even two floats on each rig.  If you are fishing down 30 feet in 70 feet of water – no float is needed. Most rigs I now make have no floats on them but I regularly carry a couple with the torpedo-shaped floats (not shown).

Colors, shapes and sizes of floats provide plentiful choices but my preference is for the pill-shaped or torpedo-shaped floats in medium or large size.  If you are going the route of using floats, you will want to spend a little money to build up an inventory of color choices.
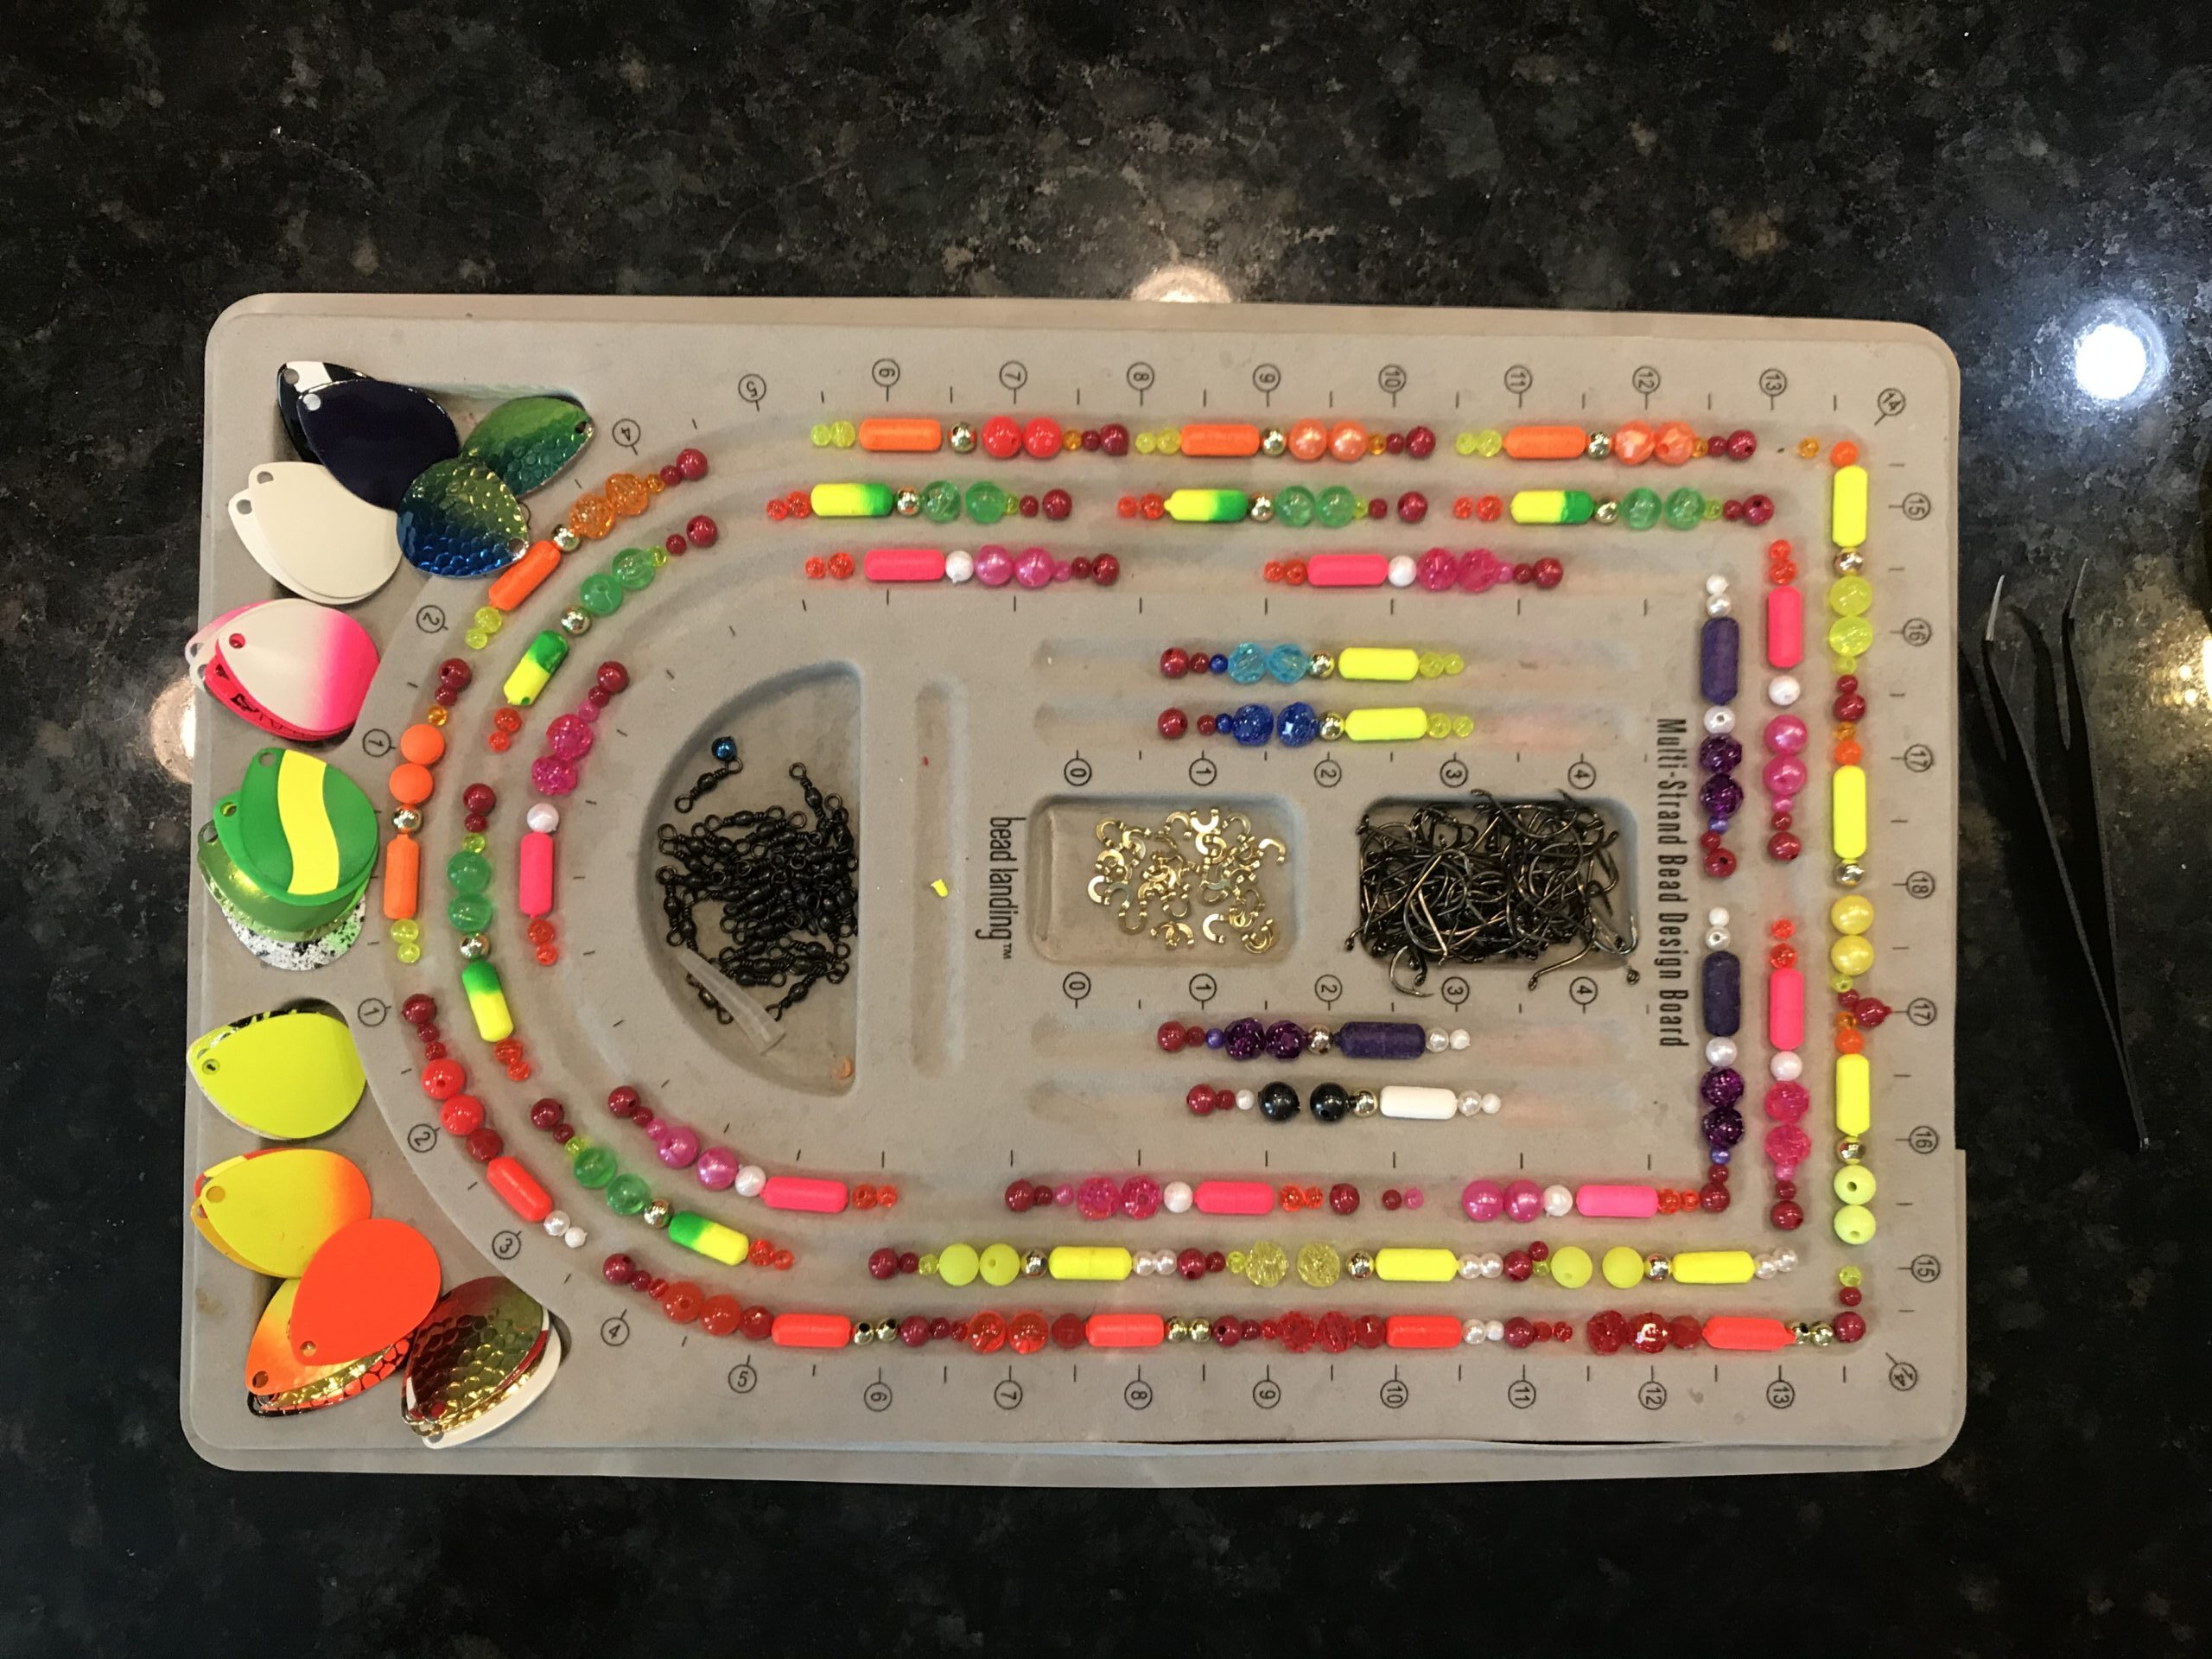
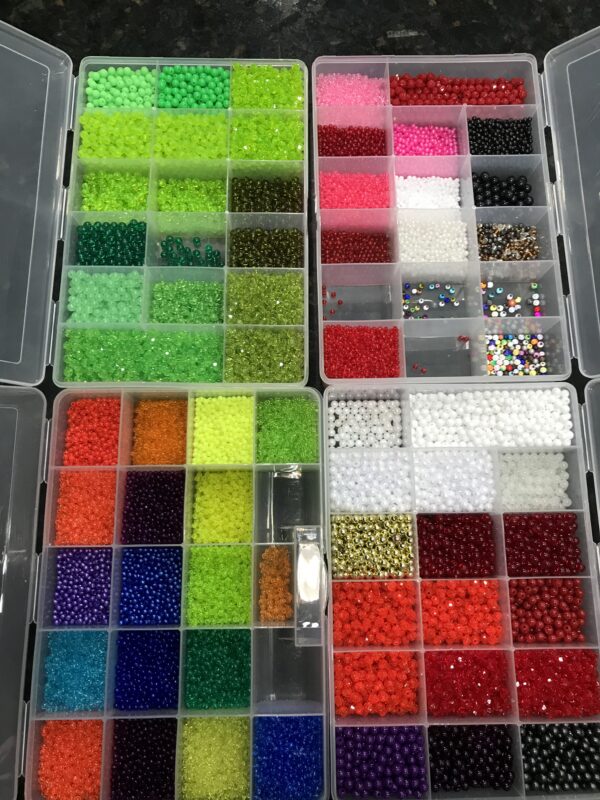
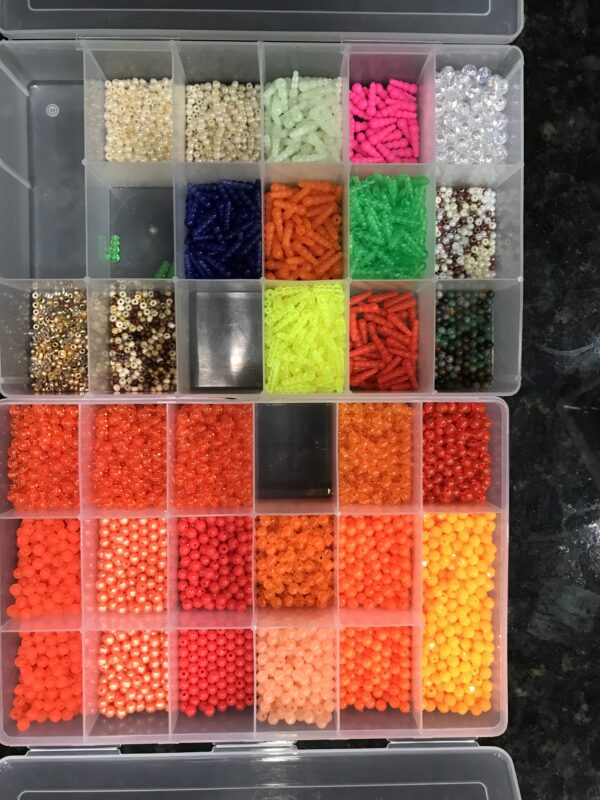
BEADS

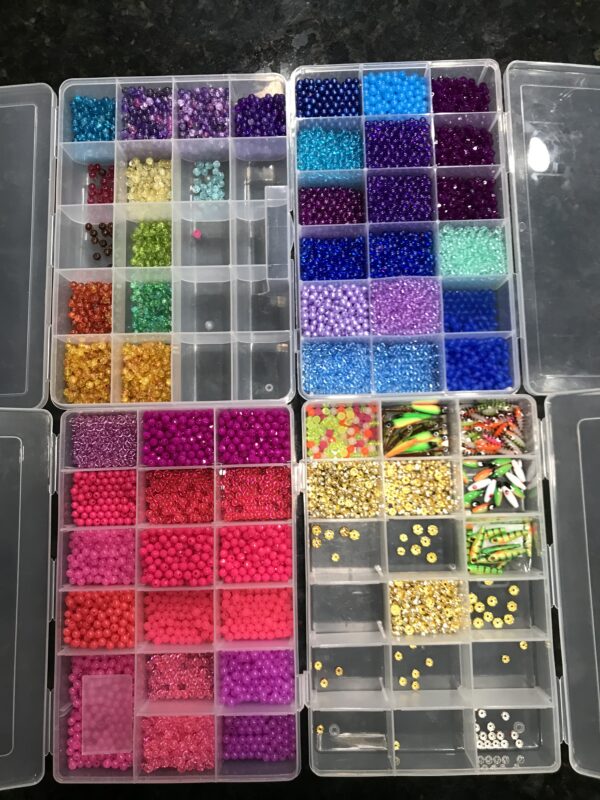
One of the debates from over 20 years ago on walleyecentral.com was about which was more important – the blade or the beads.  I think the audience on that particular chat stream was pretty much split.  I prefer to think of the rig or harness as a whole.  I happen to believe it is the combined impression of the beads and the blade working together that generate the reaction by the fish – not one or the other. So, if you think that makes sense, don’t ignore this section – it can make a huge difference in how productive your rigs are.

Some harness makers like to keep their bead choices simple.  I envy those of you that do.  If all you use is 5 mm transparent orange beads with your gold only blades, and that is all you want to use, you can skip this lengthy section.  (There are some that do.)

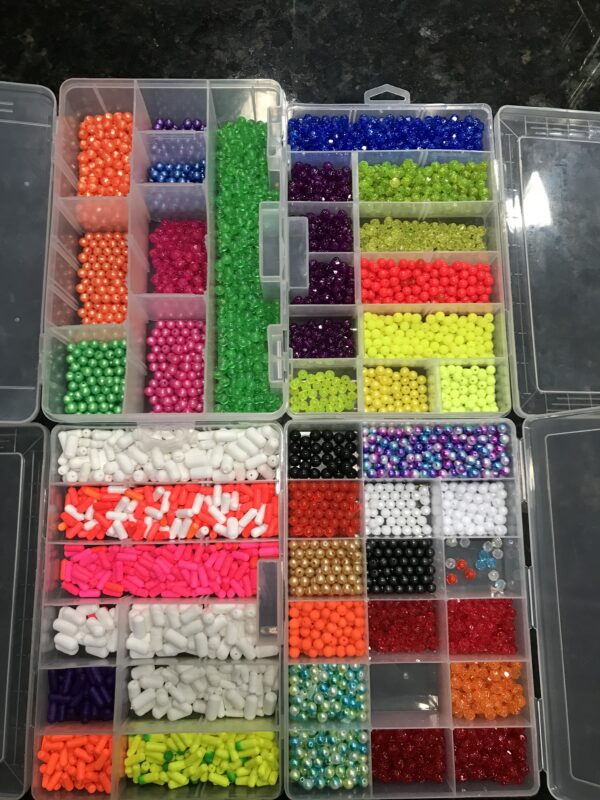
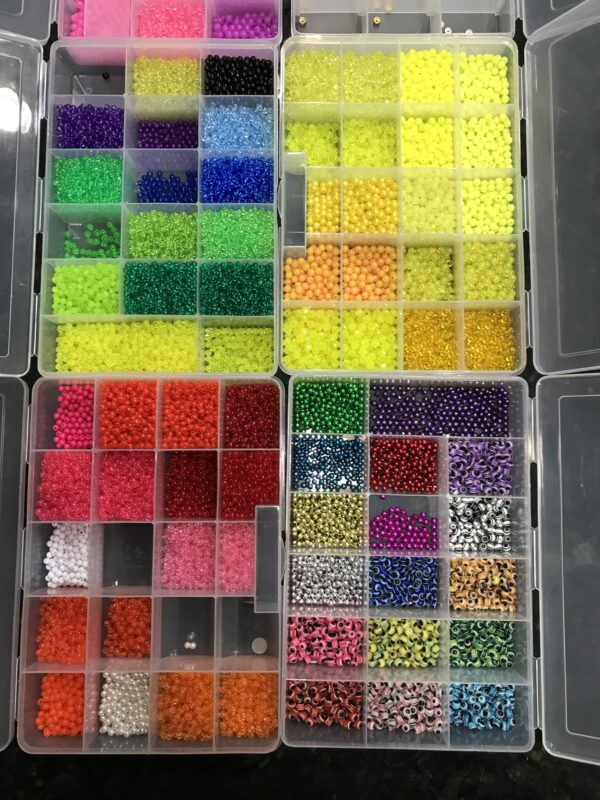
If you are going into it in a big way and plan on building your bead inventory, just start at beadtin.com.  It is the least expensive place I have found to get most of your round and faceted beads in 4 mm, 5 mm and 6 mm.  They also have 8 mm and stacked beads if you want.  They don’t have every color but they will have more color choices than most vendors.  However, check out other vendors for additional colors, shades, hues and shapes.  I found shopping on eBay and Amazon productive for wedding ring beads (“spacers”), eyeball beads and metallic beads.  While I did pick up some beads at the craft stores, these are my preferred vendors these days.  There are also “fishing beads” to consider – always more expensive – and their feature is a smaller diameter hole which is intended to reduce wobble or wear I suppose.  They are usually only available in round beads and in limited color choices and sizes.

Over time, I have found a preference to do the following in my bead selection, any and all of which you may wish to consider and choose to ignore:

  1.  Try as much as possible to match or complement the blade colors with your bead color choices. 
  2. Try to have a hint of gold in the beads somewhere.  I use a gold (not silver) wedding ring bead or a gold metallic bead.  I only use silver in place of gold if blue or silver is the dominant color on the blade.  Generally, this is because, where I fish for walleye, gold is one of the top producing colors. If you choose to use wedding ring beads, match the size of the wedding ring bead to the size of the other beads on each side of it.  In other words, use a 6 mm wedding ring spacer bead between two 6 mm beads.  If you don’t do this, it will look awkward.  Also, if you choose to use wedding ring beads, don’t be afraid to give some design thought to using two wedding ring beads in the pattern rather than just one.  After all, isn’t a “double ring ceremony” pretty much a thing now?
  3. Don’t be afraid to use faceted rather than round beads or even mix the two.  It adds to the disturbance in the water to grab the attention of the fish – however minor.
  4. Whenever possible, I prefer to use transparent beads rather than opaque.  Initially, when I started making rigs, I avoided them because I thought they were too light in color compared to the opaque beads.  However, after doing some more research, I reversed my thinking on this design consideration. I found a few articles that were by authors that felt using transparent beads created more flash in the water because of how they refracted light. And that was the line of reasoning that worked on me to change my design considerations at the time. So, it may change yours as well when you stop to consider it.
  5. I put a 4 mm bead in front and behind each clevis. This was to enable the clevis to spin free without getting caught in the hole of a larger bead.  I saw this being done on a number of tandem rigs being used on Lake Erie and stuck with it.
  6. In addition to the 4 mm bead in front of the clevis, always have a leading bead in front of the 4 mm bead that is to serve as the “eye” bead.  I started out in all my early rigs with this being a 6 mm or 8 mm ruby red bead. Later I modified my choices to include eyeball beads and other dark shade or even black beads as options for the “eye” bead.  Why an “eye” bead? The argument for it is one I got off of a couple of YouTube videos from two different rig makers – both recommending it as an addition to any rig to keep the clevis free of “junk” such as algae in the water and therefore able to spin freer longer.  There are others that believe this leading bead interferes with the clevis’s ability to spin freely but I have no observation, analysis or opinion on this one way or the other.  I just always include one.  As a rule, I use a plain dark colored bead rather than an eyeball bead for the “eye” bead if there is already an eye on the blade.  No sense having an eyeball in front of an eyeball. I will also from time to time, break my rule of the bead having to be dark and now work the color selection more into the overall bead pattern rather than sticking to a rule that “it must be dark”. Although I prefer to always have the leading bead, there is nothing to say that you cannot go without. And if you buy a harness with beads in front of the clevis and don’t like it, just remove them and retie the harness. The bonus of the extra bead(s) is in the added flexibility it gives you in color combinations and bead sequence designs.
  7. I have and use stack beads and minnow beads and am intrigued with the additional choices they provide in design and configuration.  Here again cost is a consideration if producing harnesses in bulk.  So far, I have not found a source for a good transparent purple stack bead – no idea why.  I am beginning to suspect nobody makes them. I have limited my use of stack beads due to their cost but I do really like them in designs where I want a tapered effect either leading or trailing or both.  On stack beads, if you managed your bead acquisition well, you should have a 4 mm, 5 mm and 6 mm bead of some of your main color choices.  If you did that, you can configure your own leading or trailing “short stack” without having to use the longer stack bead.  It won’t have the size 3.5 and 3 mm bead but it will serve the purpose just fine.  Also, I am finding a small number of my stack beads have their 3 mm part broken off just from shipping and handling.  So, I question their durability on their small end. If you really like using stack beads, most vendors have just single color stack beads but if you check out Walleye Supply, you’ll find multi-color stack beads to give you even more design options to consider. You’ll also find two different models of minnow beads.
  8. # of beads – Choose the length of your bead pattern to be at least the length of your blade (usually 5 or 6 beads).  You don’t want your blade spinning and knocking your bait off your hook and doing this will prevent that.  How many you actually use is up to you.  I generally will do 5 – 7 beads not counting the 4 mm bead after the clevis and the wedding ring bead. Sometimes 8.
  9. Bead patterns – many fishermen consider their bead color pattern to be their most closely guarded secret.  In my case, they are all available for anyone to see on the paintedbackrigs.com website so I have no secret patterns. Everything I have come up with or copied is out on the site.  You are welcome to peruse them all and pick the ones you like.  Or, better yet, just buy them.  This is one of the most fun parts of creating your own harnesses.
  10. Bead size – stick with 4 mm, 5 mm and 6 mm for the most part.  If you are making large rigs (size 6 and up) then you can go with 8 mm beads but you can also stick with 6 mm if you don’t want all those extra large beads hanging around in your inventory.
  11.  Metallic beads – have them and use them for some color choices.
  12. Glow beads – have some in different colors in your inventory and you’ll have even more to consider in creating harnesses for low-light conditions.
  13. Glass beads – I really like them for light refraction. I have greatly increased my inventory in them over the past 3 years and frequently use them in the harnesses I now make. They are a step up in quality from plastic beads but only the connoisseurs of crawler harness making really appreciate their added fish-attracting capabilities. They also cost more and weigh more than plastic beads – two additional considerations. You will have to shop around with various vendors to build your inventory choices up to match your blade color combinations.
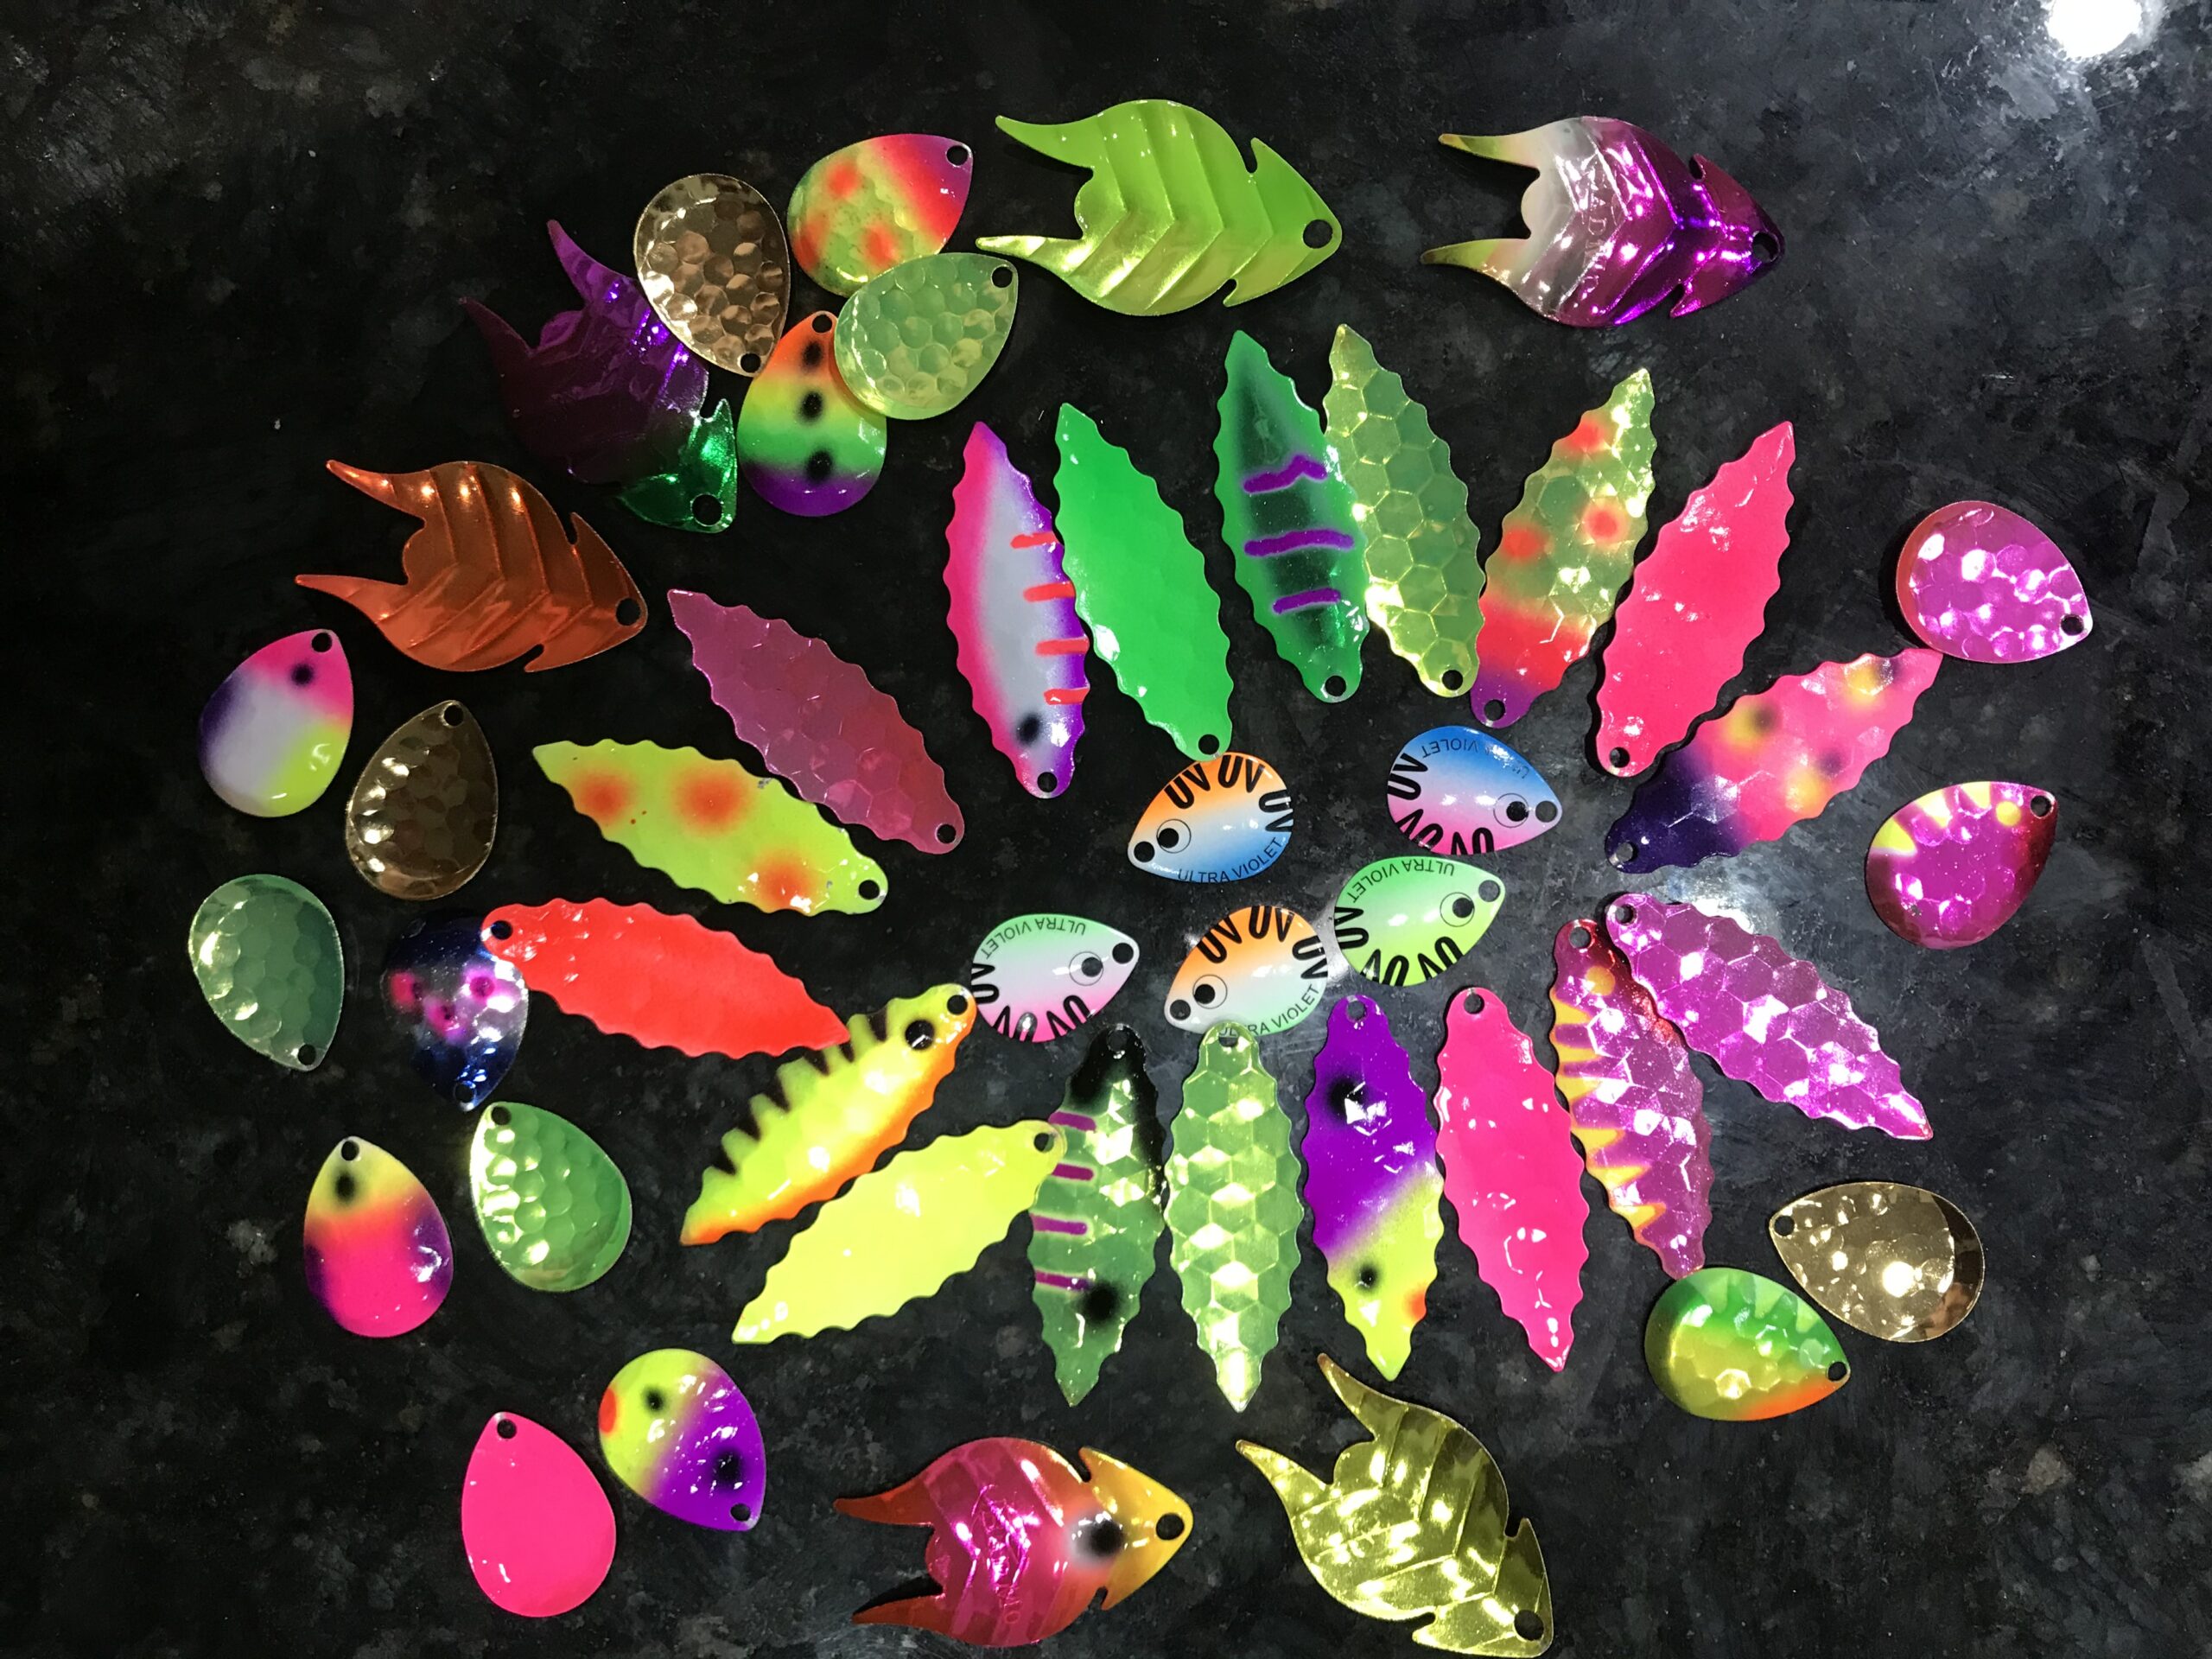
BLADES

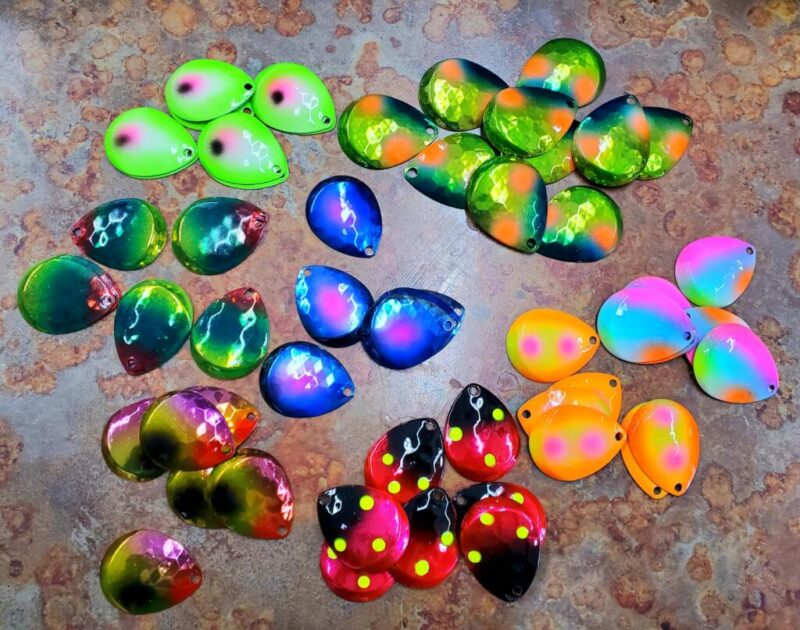
I will just get this out of the way to start with.  I have no experience nor do I use Smile, Dakota, Tomahawk, Whip Tail, Cascade or Spiral spinner blades.  I am most familiar with Colorado, Willow Leaf, Arrowhead and Hatchet blades.  I have some use and / or make harnesses / rigs with propeller, Dutch Fork, French and Indiana blades.

If you are starting out making your own spinner rigs or starting out shopping for spinner rigs for yourself to use, start with size 4 Colorado blades for slower trolling and size 4.5 or 5 Willow Leaf blades for trolling a little faster. These alone will provide you with an endless variety of sizes and colors to fill your tackle box.

In the world of Colorado spinner blades there are still other things to consider.  Deep cup vs regular shape vs magnum.  Smooth vs. hammered vs dimpled vs fluted vs those with a hole in them.

In the world of Willow Leaf blades, there are the regular shape and the serrated and super shapes.  And they are also either smooth or hammered.

Presuming you are fishing for walleye, start with regular Colorado size 4 smooth blades and go from there.  Add to your inventory according to your planned use.  Big water, big fish, bigger lures.  Perch – smaller lures.

You probably already know or have a good idea as to what colors will work best where you fish for what you are fishing for.  Your selection of what spinner rigs / crawler harnesses to buy or make will begin with your thoughts on what color choices you want to have for the blade on the end of your line.  Where I fish, the first color choice is gold, followed by an orange/white combo followed by chartreuse. Others I fish with will tell you that pink and multi-color such as the Wonderbread color combo are better for that same water.  If none of those are working, out come the antifreeze, purples, blues, greens and reds.  Never is silver/chrome a choice to consider where we fish and those lures are forever banished to the bottoms of our tackle boxes. For our group. You get the idea.  You want choice but it’s got to be the choice of right choices.

Blades may also have different finishes on them. Ultraviolet and fluorescent blades add more visibility and are a neat option to have in your arsenal. Antifreeze finishes on the back and sometimes also on the front of the blade give you another look to consider. Which leads me to the last thought I think I want to share on this topic.  Whether making rigs or buying them –  unless you want to have a silver or nickel back on your spinner blade, start with a blade with a painted back.  If not one with a painted back, then one with a gold, copper or brass back.  Avoid a silver or nickel back.  If shopping for blades, unless they tell you or show you the back of the blade color, just assume it is silver or nickel when you make your purchasing decision.  Just keep in mind, if the fish is following your harness from behind, it is seeing the color on the back of the spinning blade much more than the front of the blade. For me, of course, I always prefer to start with a Painted Back Rig.

Posted on

CRAWLER HARNESS DESIGN Part One

By Norm Ziesman

(This blog was updated on January 25, 2024)

Crawler harness design – the selection of components for crawler harness construction is the most engaging part of building them.  You will use your planning, budgetary, communication, procurement, creative and logistic skills in this stage as well as a good healthy dose of common sense. In this two-part blog I will walk through each component and what information and opinions you ought to be aware of and consider in making your choices.  I will also give you my choices and why I made them but that is not to say they are the choices you should be making.  I will also tell you where I started out with a “rule” then varied from it and why.  It is only information for you to consider when you make your choices. 

The selection of components for spinner rig construction is the most engaging part of building them.  You will use your planning, budgetary, communication, procurement, creative and logistic skills in this stage as well as a good healthy dose of common sense. In this two-part blog I will walk through each component and what information and opinions you ought to be aware of and consider in making your choices.  I will also give you my choices and why I made them but that is not to say they are the choices you should be making.  I will also tell you where I started out with a “rule” then varied from it and why.  It is only information for you to consider when you make your choices. 

I am guessing if you have read this far, you already have made quite a few and are looking to either see how much we agree or disagree or you are looking to validate your choices.  But, if you are just getting started, this blog is chock full of information for you to digest in a wonderful new hobby or business venture.  My advice is to not expect to get rich from this as a business venture – few ever do.  Do it because you enjoy it and like seeing or hearing that what you created caught fish and put food on someone’s table.

We will deal with each component in the order you would if you were assembling a rig now. Warning – once you get into it, you’re hooked.

LINE

In deciding what line to use (brand, material) and what strength, the main choices are monofilament, fluorocarbon and hybrid (a blend of the two).  Most people would not consider braid an option as it is so tough to break, you would likely lose too much equipment on snags.  If you are making your own, I would say use what you like most in your price range. If you are making them for others, then the fluorocarbon will be the more popular choice.  Mono is definitely easier to work with.  It is more flexible and you will consistently get your snell knot loops or coils to lay flat next to each other.  Fluorocarbon gives you the invisibility along with its stiffness.  Because of its stiffness, when tying snell knots on smaller hooks where the metal is a smaller diameter, it is a little more difficult to get all the snell knot loops or coils to lay flat against each other. In my early days I made rigs with 10 lb. and 20 lb. mono for private use.  When I started making more for possible resale, I began with 20 lb. fluorocarbon, dropped down to 14 lb. and then settled on 15 lb fluorocarbon.  This was primarily due to the diameter of the line and market considerations.  I found with 20 lb. fluorocarbon, I had some issues getting line through hook eyes twice when using the Simple Snell Knot. Changing the line and the knot (using a more advanced Snell knot) solved that.

Brand of line can get to be a heated topic. I have used only 5 different brands – Berkley Vanish, Stren, Yo-Zuri, PLine and Seaguar Abrazx. I tie a lot of crawler harnesses and reputation is everything in the retail world. So, for now, I have stepped up to the top of the line and am going with Seaguar Abrazx go forward.

The length of the line or leader is an important consideration in your rig design. Keep in mind that the walleye are not down there in the water with a measuring tape to make sure your offering meets their regulations. So, when we talk about length of leader, it does not have to be exactly that length. Most common leader lengths are 2.5, 3, 3.5, 4, 5 and 6 feet. To some extent, this is a personal choice. Having said that, you should factor into your choice the weight of your rig, whether you have one or more floats on it, how snaggy it is where you will be fishing, water clarity and desired ease in netting a fish given the size boat you will be on. In “Mille Lacs – Thirty Years On The Big Lake: Memoirs and Secrets Of A Walleye Fishing Guide” by Joe Fellegy there are numerous references, insights and stories about the choice of leader length. In it, he describes situations where he would go up to 12 and 14 feet in snell length. I make most of my snells 5 feet in length and I see many do 6 feet and many also do 4 and 3 feet. I used to do smaller lighter snells (size 2 Colorado blades) at 3 feet. My only thought on this is it is easier to make a snell shorter by cutting it, trimming it and retying but it is nigh impossible to make it longer. In making a snell, when it comes time to cut the line from the spool, I always measure off 21 inches longer than the desired ending length for a 2-hook snell, 12 inches for a 1-hook snell. This allows me enough line for my fingers to work with for the snell loops when tying the hooks on, the gap between hooks (if 2) and enough to easily tie off the last hook and the leading swivel. So for a 5-foot snell, I always start with 6 feet 10 inches of line. You can certainly do it with less, but the little bit extra makes it easier for me to tie the knots off.

KNOTS

Most educational videos on YouTube on how to make your own spinner rig start out with showing you how to tie what is often called the Quick or Simple Snell Knot or the Knotless Snell Knot. It is how I started out.  This link shows you the knots to choose from.  I made my first 500 rigs with the Quick or Simple Snell Knot. They work fine but, to be honest, I don’t like them for two reasons.  One – they do not look like a professional Snell knot – the line goes through the eye of the hook twice and the line passing over the outside of the loops is (to me) an eyesore.  Two – the more common complaint – you can push backwards on the line to loosen the knot. After looking at the other knots, I settled on the Uni-Knot Snell Knot.  It looked professional and had the features (path of the line) I liked.  With advancing numbness and arthritis in my hands, I found it a bit hard to tie correctly every time.  I could do a 1-hook snell Uni-Knot Snell Knot no problem, but when it came to tying a 2-hook snell, forget about it.  I needed something similar but easier.  It turned out there was a way to make this knot using a tool such as a straw or tube.  I tried that as well but when a Canadian guide friend told me about the Tie-Fast Tool, I decided to give that a try and have stuck with it ever since.  It turned out to be a lot easier to use than a straw. It took a while to master it and I have now made over five thousand with it.  The only challenge with this tool when using fluorocarbon line, is to get all the snell loops to lay down flat next to each other without one loop or coil jumping up a bit or overlapping.  When you do it right, the resulting snell knot is a thing of beauty worth admiring and I often do that. Yes, I know now I do need help. The trick is to make sure all the coils are properly aligned and wet, before you tighten the knot. Don’t count on the line correcting itself and properly aligning – sometimes that happens but usually to ensure perfection on every knot, you need to pause , take the extra minute and make sure all the loops are going to tighten properly without overlapping one another.

Give the Tie-Fast Tool a try if you would like to, the tool is inexpensive.  They call the resulting knot the Nail Knot Snell Knot but I think from following the path of the line in the diagrams, it is the same path as the line in the Uni-Knot Snell Knot.

A lot of experienced fishermen will tell you that they use the Simple Snell Knot because that is the easiest to tie when they are out in the boat and making new rigs on the fly. That is also true and I totally agree with it. It is what I would do also if I were in the boat tying one up. However, I try to avoid spending any time in the boat tying rigs. 

One last thought on knots – since I also finish up (or start?)  the rig with a swivel rather than a loop, I use a Palomar knot to tie on the swivel.  If you are doing the Palomar knot on your swivels, watch to make sure you don’t have any twists in the line and you will have the best Palomar knot. More on the use or non-use of swivels in the spinner rig itself in Part Two.

HOOKS

There is a lot to consider when selecting hooks. First is how many hooks are you going to need?  Are you making 1-hook, 2-hook or 3-hook snells?  What sizes do you want to use? Is the last hook going to be a treble hook? If you are planning on using Slow Death hooks, will there be a trailer hook? How many harnesses do you plan on making?  The more rigs you are going to make and the more hooks on each rig, the more hooks you are going to need to buy.

The reason I point this out is that the clear leaders in perceived hook quality are expensive relative to most other brands.  (I say “perceived” because if you ask the average fisherman which hooks are the best, they will likely all give you the same answer. Very few of them have conducted any experiments to prove it.) Along with this line of thinking, I started out with that premium brand you all know.  If you are buying 20 at a time and you only need 20 or 40, you’re good.  If you are buying 20 at a time and you need 400 or 800 or 2,000, not so good.  This is a great candidate for you to do some comparative shopping if budget is a concern.  Find a good vendor that meets your needs for brand and hook model availability.  This is a good test of your procurement and communication skills.

Most people that have bought a lot of hooks have developed some sort of brand loyalty so I won’t try to talk you out of yours.  Just be aware there are significant price differences.  For those that are new to this, if you are looking for American-made hooks, then there is only one brand left doing that and I am not sure all their hooks are made in the US.  Or that they are all made with US Steel for that matter. Otherwise, ALL of the other hook manufacturers make their hooks outside the United States – hooks are made in China, Japan, Belgium, France, Norway, Singapore, Portugal and Malaysia.  If your guiding principle is to buy American first, then it’s Eagle Claw for you.

As my needs increased and my buying requirements increased in volume, I looked for and found a well-known bulk supplier that offered all the brands and types of hooks to compare. Make sure, if you are based in the United States, that you also check out Canadian vendors as once you factor in the favorable exchange rate, their prices are the same or even lower than the lowest American prices you can find.

For type of hook, I had initially decided I wanted to go with red circle hooks.  I was quickly corrected on this by a Canadian professional walleye fisherman and switched to Octopus (or beak) hooks.  The advice I was given was that circle hooks will cause you to miss too many strikes when trolling with a spinner rig.  I retied all my rigs that had circle hooks on them and replaced the hooks with Octopus hooks. Today, those unused circle hooks still sit in my supply trays. If you prefer, you can go the route of Aberdeen hooks or Slow Death hooks which I have also tried. For now, I am sticking with all red Octopus hooks for all the rigs that I make.  I may build more of the Aberdeen or Slow Death in the future and have not ruled them out. Because of the added twist from the hook design, I would recommend you consider using a ball bearing swivel on all your Slow Death harnesses or a ball bearing snap swivel on your line if just tying a loop on the harness. There are other bait-holding hook styles to evaluate and you also need to think about whether you want a short shaft or a long shaft on your hooks. While I think a lot of these hook style choices are important to consider, remember they all have their use and some are more suited to trolling live bait than others. And some are more suited to specific situations or type of bait than others.

Treble hooks – many rig-builders like to make their trailing hooks a treble hook.  The argument is they give you a better hooking percentage.  The pushback from the disbelievers is they really don’t. The other argument against treble hooks is they tend to tangle in the fish net more than straight hooks. If your making rigs to sell, let your customers be your guide.  I have started out with single hooks for both the leading hook and trailing hook and so far, have not changed or added trebles.  I have not ruled them out for the future though.

Barbless hooks – while some regions now require hooks to be barbless and no doubt, over time, other regions will follow, for now I have chosen to stick with barbed hooks. For those that need barbless, they are already familiar with how to pinch down the barb and are not expecting most private tackle vendors such as myself to have barbless hooks. We may all have to someday but not yet.

Slow Death Hooks – if you insist on having a trailer hook, you are going to have to use a set of pliers and pinch down the barb on the leading Slow Death Hook or it will cut your line. Also, if using a single Slow Death Hook, use a Palomar knot on the hook. Why? That particular hook works better that way. But you’ll need to do a Snell knot if you are wanting a trailer or figure some other way to attach the trailer to the leader. And, again, absolute must – ball bearing swivel.

Now that we have covered brand and style, that leaves us number of hooks, size of hooks, color and spacing yet to discuss.

I initially made half my rigs with 1 hook and half with 2 hooks. I did not make and still have not made any with 3 hooks.  My thinking was when people just wanted to use a live minnow, salties or leech, they might only want 1 hook, but if they were using crawlers or plastics they would want 2 hooks.  And it is rare that someone asks for 3 hooks. Once I started building rigs for public sale though, I decided rather than build half of each, I would build all of them with 2-hooks.  Then, if the person using the rig wants only 1 hook they could just trim off the trailer.  The leading hook was tied so that it would stay on the line by itself so the rig would still be useable. 

A discussion on selecting hook size will, no doubt, trigger some debate.  While I started out with all size 2 Octopus hooks, for both leading and trailing hooks, I have since altered that.  For size 6 Colorado blades, I have done some with a size 1 leading hook and a size 2 trailing hook and others with both hooks size 1 or both hooks size 2.  For size 5 Colorado blades, most are either a leading size 1 and a trailing size 2 or both size 2. For size 4 blades, I used to do a size 2 leading hook and a size 4 trailing hook but now all of them are made with both hooks size 2. For size 3 blades, I have done two size 2 or a size 2 and a size 4 or a size 4 and a size 6. For size 2 blades, I would do a size 4 followed by a size 6.   I know others will use larger hooks even up to 1/0 for walleye but, for now, for the rigs I am building these are my current choices.  Over time, I moved away from size 6 hooks completely (I don’t make any crawler harnesses with size 2 blades currently).

I am aware there are many colors of hooks being offered besides the more common bronze, black, nickel and red.  To this point, I have not encountered anyone using the newer colors nor have I seen any demand for them.  If one becomes more dominant as a popular choice, I will add it to the product line.  I will have to do more research on people’s experience and reports on various colors. For your own rigs, certainly your choice is the best choice for you.  Fluorescent or not?  I don’t know. For now, for me and the crawler harnesses I make for me or to sell, it is all red hooks.

And, lastly on hooks, the topic of spacing often comes up.  While I started out my 2-hook harnesses several years ago with many of the hooks at 3 inches apart, I long ago switched to 3.5 inches apart.  I know some do less and some do more.  But 3.5 inches seems to me to work the best.

RULE

Your choice of snell knot will determine whether you first tie on the trailing hook or the leading hook.  If you chose the Simple Snell Knot, you start with the trailing hook, and then add the leading hook.  If you chose the Uni-Knot Snell Knot, or Nail Knot Snell Knot, you start with the leading hook, and then add the trailing hook – which means you have to have a tag long enough for the second hook when you are tying the first leading hook.

EXCEPTION

An exception to the above rule occurs, when you select the Uni or Nail Knot, forget to leave enough tag line for the second hook and the hook you tie on first ends up being the trailing hook.  In this case, you can mix knots and still add the leading hook using the Simple Snell Knot.  Just don’t tell anybody.

Later on in Part Two of Spinner Rig Design Considerations I will cover beads, blades, clevises and swivels.